
This one is pretty niche… I recently had a requirement (well 2 in fact) to embed a canvas app into Power Pages in full screen mode.
This very helpful page was my starting point. It provides the URL format needed for embedding.
Here’s the format. All you need to do is swap [AppID] with the actual ID of your canvas app (remember to lose the square brackets!):
https://apps.powerapps.com/play/[AppID]?source=website
Starting point – embed the canvas app using an iframe
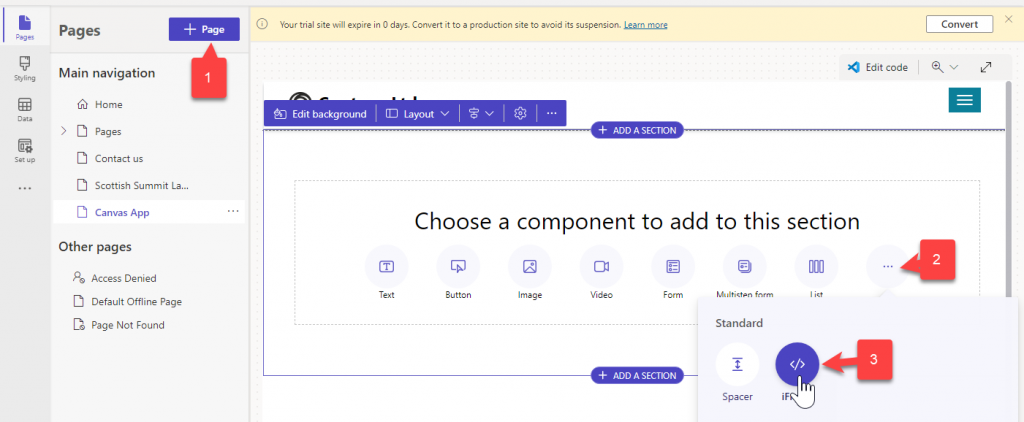
Add a new page
Select … then iFrame
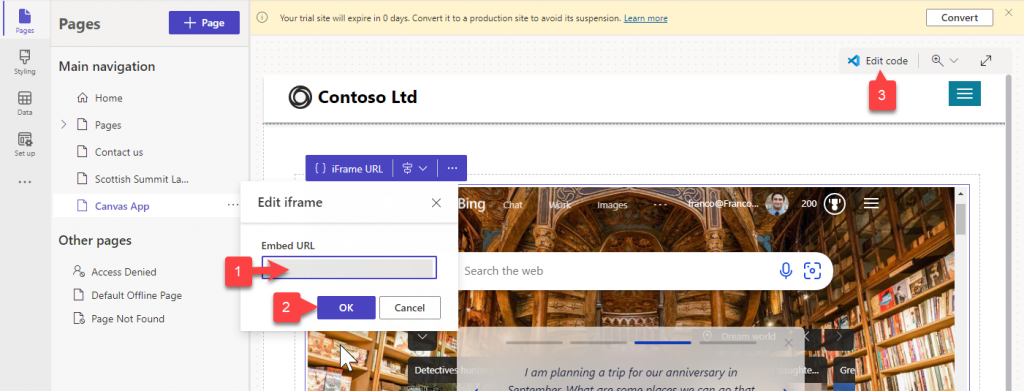
Enter the URL for your canvas app in the Embed URL field and click OK
Click Edit Code to open the web page for editing in Visual Studio Code
Actually, I just went straight for code when creating mine…
Firstly, let’s provide some dimensions for the iframe. These dimensions worked well for me. Feel free to tweak to your heart’s desire:
- Width: 100%
- Height: 768px
Here’s an example of my iframe code including width, height and a class (app ID excluded):
<iframe frameborder="0" width="100%" height="768px" src="https://apps.powerapps.com/play/PASTE YOUR APP ID HERE?source=website" class="canvas-app-embed"></iframe>
I also add a class of canvas-app-embed. I could’ve called this anything really. Its only purpose is allowing us to select this for styling / scripting.
On the subject of scripting, that height I specified is just a rough starting point. I then use a little jQuery when the page loads to expand the iframe to the full height of the window:
  $( document ).ready(function() {
    var windowHeight = $(window).height();
    $('.canvas-app-embed').attr('height',windowHeight + 'px');
  });
When VS code opens, we have 3+ files in the workspace:
- A CSS file for styling our page
- A JS file for any scripting / interactivity
- A HTML file for our markup (you may see multiple HTML files if you have multiple languages installed)
Select the JS file first and paste in the jQuery from above
Press Ctrl + S to save
Next, select the HTML file.
Delete all but the iframe
Edit the style tag so width is 100% and height is 768px
Press Ctrl + S to save
Finally, select the CSS file.
Here’s some CSS that’ll hide your Power Pages website’s header and footer:
.navbar-static-top.navbar-inverse {
    display: none;
}

footer.footer {
    display: none;
}
…and that’s it.
Sync to bring your changes from VS code back to your Power Pages session
and then hit Preview and admire your work :)

4 comments
Great post and walkthrough Franco!! Keep inspiring.
Hi Franco.
Great Post. It is very usefull.
When you add the power page component “List” do you see in “List settings” the “Actions” to create, update, delete records ? – enhanced model.
It was available on “List” in the standard model, but unfortunately I don’t see those settings in power pages with the enhanced model.
Exactly what I needed, thank you for typing this up!
You’re most welcome. Thanks for taking the time to share the feedback 🙂