The relatively new Rich Text Editor control in Dataverse / Dynamics 365 / Model Driven Apps is a very welcome addition, especially for Power Pages / portal projects that are heavy on content management. Even just the basics like headings, bulleted lists, numbered lists and tables can be a real pain otherwise. In case you haven’t heard, these Rich Text Editor controls are now supported on both Basic Forms and Multistep forms 😎
Wait, what?.. there’s a rich text editor control?!
Yes and it can be applied to any text column… and is well supported in portal forms 🙌
Here’s a handy guide from Microsoft about how to add the control in your Model Driven App forms
How to add a Rich Text Editor for use on Power Pages forms
Once you’ve added the control on your model-driven form, open the Basic Form or Multistep form step that your text field lives on
Select the Metadata tab and click New

Set the Type to Attribute
Select the required column from the Attribute Logical Name drop-down
Set the Control Style drop-down to Code Component

So how does the rich text content look on portal forms?
Good news – they look professional and native, phew!
What about in portal lists?
Actually it’s not plain sailing. There are some gotchas… We can include the fields in our lists BUT it’s the raw content that gets displayed, HTML tags and all
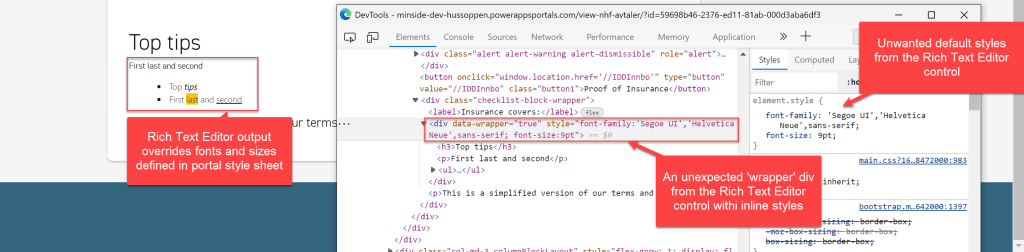
What about outputting with liquid?
We can output HTML easily enough using your favourite liquid skills; fetch xml, the entities object, etc.. but again there’s a gotcha to work around: the field’s output is wrapped in a div that contains inline styles, setting the font size and font family which are most likely to clash with the rest of the page.
Okay, what’s the catch? What’s not love?
Like with many rich text editors, users are free to format their content using familiar visual tools like font styles, headings, bold, italic, alignment, inserting hyperlinks, etc. And the tool generates HTML behind the scenes.
For us control freaks, it’s good to know that the editing and formatting options available in the visual editor can be restricted so that we don’t let users go crazy with colours and font choices that overrule our carefully crafted on-brand CSS.
Note – fear not, I’ll show you how to avoid this nightmare below but I couldn’t resist🤡

Here’s a handy CSS snippet to cancel that out:
div[data-wrapper="true"] {
font-family: unset !important;
font-size: unset !important;
}
Tip: What does that CSS mean / do?
If you haven’t used unset before, unset (in layman’s terms) allows us to cancel out a style property without setting it to something else. For example, I don’t have to specify which font and font size to apply to the rich text editor instead. Essentially I’m saying give it
!important is a way to combat specificity. CSS is all about specificity; from global styles to styles targeted to very specific combinations of ids, classes, etc., right down to inline styles applied using the HTML style attribute. The reason we need to use !important here is that inline styles trump the specificity of global styles in our style sheet, regardless of which selectors we choose. We should use this sparingly but this is a good use case in my opinion.
My configuration – prevent fugly content from sneaking into your beautifully styled portal
Here’s some configuration JSON. this will:
- Add the ability to expand the field to full screen while editing
- Allow you to view /edit the HTML
- Restrict formatting options to:
- Bold, Italic, Underline
- Bulleted lists & numbered lists
- Add / remove hyperlinks
- Strikethrough
- Remove formatting
- Tables
Basically, removing temptation to control font size, font colours, dodgy fonts, etc…
{
"defaultSupportedProps": {
"toolbar": [ { "items": [
    "CopyFormatting",
    "Bold",
    "Italic",
    "Underline",
    "BulletedList",
    "NumberedList",
    "Link",
    "Unlink",
    "Strike",
    "Undo",
    "Redo",
    "RemoveFormat",
    "Table"
    ] } ]
},
"showAsTabControl": true,
"showHtml": true,
"showFullScreenExpander": true
}
For where to add this config, see this guide on Microsoft Learn
Adding my JSON as a JavaScript web resource:

Here’s the control in place in the modern form designer:

Here’s the ‘after’, with the styles tamed and fitting in with my portal CSS:


Big thanks to Valentin Gasenko for spotting that I’d missed this from my write-up.
Valentin creates awesome content on Power Platform, be sure to check him out. Here’s my favourite Power Pages article of his, all about improvements & customisations we can make to Lists: https://www.linkedin.com/pulse/small-improvements-customizations-power-pages-entity-list-gasenko/
For more information on the configurable options, click here:
https://docs.microsoft.com/en-us/powerapps/maker/model-driven-apps/rich-text-editor-control
Words of warning / sanity check
All the HTML tags responsible for the formatting count against the maximum character length allowed for the fields. This only dawned on my when a client complained they’d only typed 10 words and had exceeded the 500 character limit on the field. You may find you need to increase the maximum character count quite substantially for HTML vs plain text.
My (very short) wishlist
One limitation I was surprised about is the lack of predefined ‘Styles’ like we’d find in WordPress, Microsoft Word, etc. While I don’t want to give users / content editors free reign over my portal CSS, being able to select from Heading 1, Heading 2, Paragraph, etc. would’ve nice.


Thanks, great article, very helpful
I don’t see any blog, article, or post on how to enable breadcrumb in power pages. I see Microsoft don’t go into those details in any articles and just repeat steps from the power apps portal. Maybe I missed something,Can you please check where exactly you can find breadcrumb components in the power page ?I have checked many articles but I feel I miss the trick.
https://learn.microsoft.com/en-us/power-apps/maker/portals/add-breadcrumb
https://ulrikke.akerbak.com/2022/03/22/power-portal-breadcrumb-with-fontawesome-arrow/#comment-1059
They should already be present in the page header as part of the web templates your template site uses. However not every template site includes breadcrumbs necessarily. Which site template are you using?
Yes, I see. There is a Web Template called “Breadcrumbs”. You can include it where you want using the Liquid statement {% include ‘Breadcrumbs’ %} so it wasn’t that complex. I have done it.
I know to to implement left nav in power pages using Liquid templates
https://www.youtube.com/watch?app=desktop&v=jpHGvMsKxtk
Have you heard how to implement “Microsoft left navigation” in power pages ? This is a specific left nav like in MIcrosoft Office 365 with icons which users can collapse and uncollapse. Sometimes it is called “Burger menu”
I’ve implemented similar in the past but with Bootstrap 5 on its way, I’d wait and use its off canvas component for that
From official Power Pages templates, I mainly use template 4 “Starter layout 4”, but I can switch to template 5 “Starter layout 5” if I can easily build MS left hamburger menu like in Dynamics 365 . Do you mean by “Bootstrap 5” the “Starter layout 5” ?
https://learn.microsoft.com/en-us/power-platform/release-plan/2023wave1/power-pages/use-bootstrap-version-5-power-pages
You mention wishing you could add formatting for headings. This is possible, you can enable basically any Ckeditor tool. The tool you refer to is simply called “Format”. You might want to combine that with adding “format_tags”: “p;h1;h2;h3;h4;h5;h6” to your JSON file to control which formats are available.
Thanks for sharing, Paul 🙂